×
Menu
Index

Form  toolbar

Form  toolbar
1

Insert Form

1. Insert Form
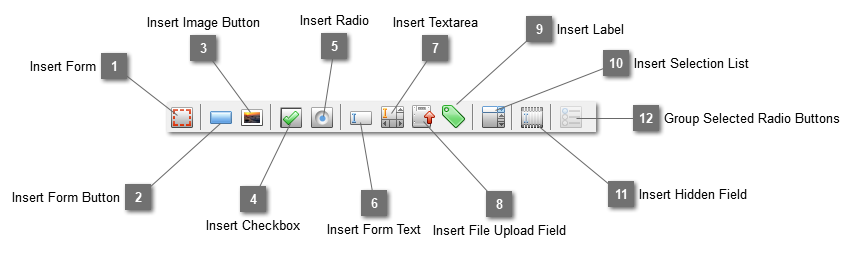
Insert a form into the active page. Please note that Forms cannot overlap each other. Double click the inserted form to open the Form Properties Dialog  to change the properties of the form.
2

Insert Form Button

2. Insert Form Button
Insert a form button to the selected form. Double click the inserted button to open the Form Button Properties Dialog to change the properties.
3

Insert Image Button

3. Insert Image Button
Insert a form image button to the selected form. Double click the inserted image button to open the Form Image Button Properties Dialog to change properties.
4

Insert Checkbox

4. Insert Checkbox
Insert a form checkbox to the selected form. Double click the inserted checkbox to open the Form Checkbox Properties Dialog to change properties.
5

Insert Radio

5. Insert Radio
Insert a form radio button to the selected form. Double click the inserted radio button to open the Form Radio Properties Dialog to change properties.
6

Insert Form Text

6. Insert Form Text
Insert a form textbox to the selected form. Double click the inserted textbox to open the Form Text Properties Dialog to change properties.
7

Insert Textarea

7. Insert Textarea
Insert a form textarea to the selected form. Double click the inserted textarea to open the Form Textarea Properties Dialog to change properties.
8

Insert File Upload Field

8. Insert File Upload Field
Insert a file upload field to the selected form. Double click the inserted file upload field to open the Form File Upload Field Properties Dialog to change properties.
9

Insert Label

9. Insert Label
Insert label to the selected form. The Insert Form Label Dialog will be opened for entering the label text.
10

Insert Selection List

10. Insert Selection List
Insert a selection list to the selected form. Double click the inserted selection list to open the Form Selection List Properties Dialog to change properties.
11

Insert Hidden Field

11. Insert Hidden Field
Insert a hidden field to the selected form. Double click the inserted hidden field to open the Form Hidden Field Properties Dialog to change properties. Though only one hidden field is shown on the form, multiple hidden values can be added through the dialog. So, instead of adding many hidden fields to the form, you can add just one hidden field and add many value pairs.
12

Group Selected Radio Buttons

12. Group Selected Radio Buttons
Group all the selected radio buttons to a single group. A popup dialog will be opened for entering a name which will then be assigned to the name of all the selected radio buttons. So, there will only be one radio button can be selected within this group.