Show the results after verifying the private key and the public certificate. If they match, the status will show "Succeeded" otherwise it will show "Failed".
Open the Generate Keys Dialog to generate a key pair which includes the private key and the public certificate. For backup, both the private key and the public certificate should be exported to external files and store at a safe place.
Add the certificate ID from PayPal. Assign a name to the certificate ID to identify which PayPal account it belongs. For example, set the name of the certificate to payapl@yourwebsite.com. The same key pair can be added to more than one PayPal accounts but each will have a different certificate ID.
You can follow these steps to obtain a certificate ID from PayPal:
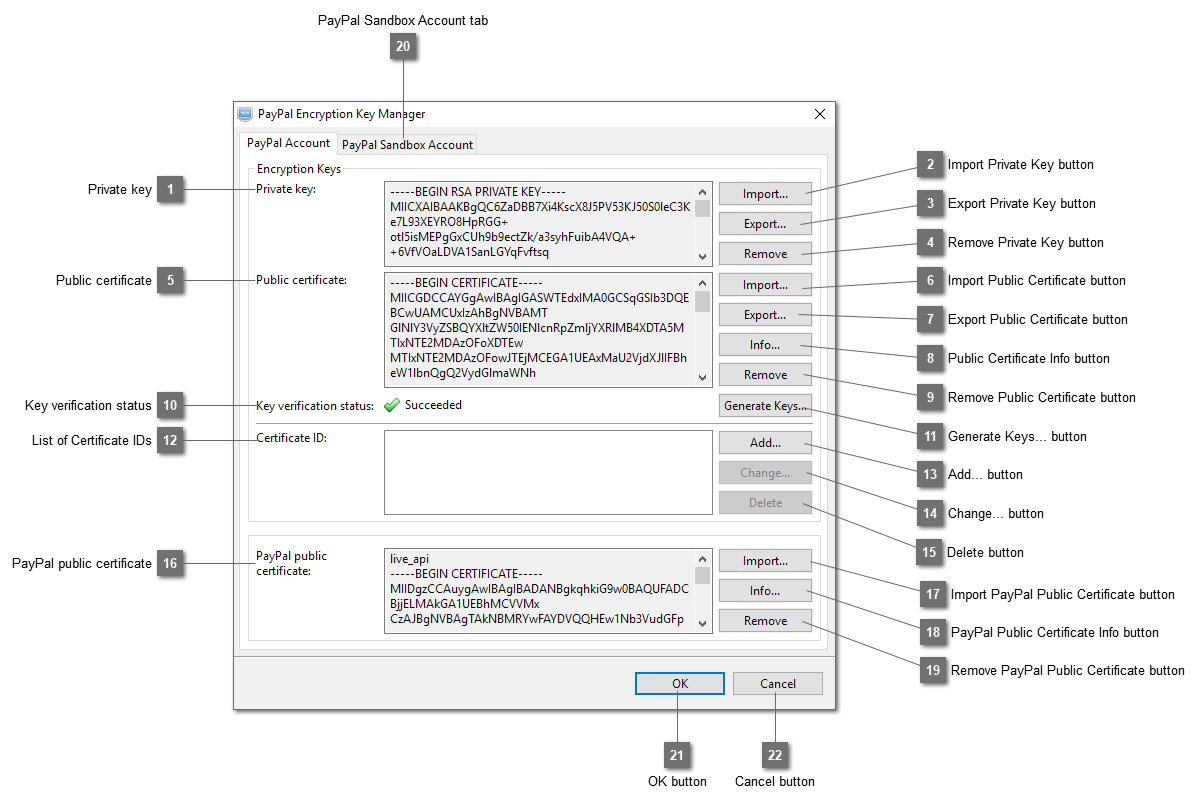
Export the generated public certificate (Not the PayPal public certificate) by clicking "Export" and store it at a file. The default name is "public.pem". You can use another name but the file extension must be ".pem". This file will be uploaded to PayPal.
Login to your PayPal account at https://www.paypal.com.
Select "Profile" from the "My Account" tab.
Select "My Selling Tools" from the menu on the left.
Select "Encrypted Payment Settings" at the bottom of the page under the section "More selling tools".
Find the section "Your Public Certificates" and click on the "Add" button at that page and you will be directed to the "Add Certificate" page.
At the "Add Certificate" page, click "Browse" to find the exported "pem" file at step 1.
Click "Add" and after the upload has been completed, you will see the screenshot similar to the one below:-
The "EPNZTX9TY9MLQ" under heading "Cert ID" is the certificate ID needed in this case. Your Cert ID will be different.
Please note that if you delete the certificate from the PayPal site and add it again, the Cert ID will be different even though you still use the old generated public certificate. You need to update the newly generated "Cert ID" here again by clicking the "Change" button.
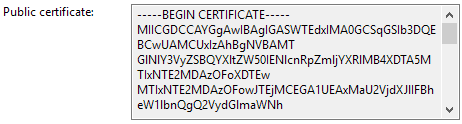
Import the PayPal public certificate from an external file. This certificate can be obtained by following these steps:
Login to your PayPal account at https://www.paypal.com.
Select "Profile" from the "My Account" tab.
Select "My Selling Tools" from the menu on the left.
Select "Encrypted Payment Settings" at the bottom of the page under the section "More selling tools".
Click the "Download" button below the heading "PayPal Public Certificate" and save the file at a directory of your choice.
Click this button "Import" and browse to the directory that you store the PayPal public certificate. You may need to change the file filters of the Open Dialog to "All (*.*)". The name of the PayPal public certificate file is "paypal_cert_pem.txt".
After importing, the certificate will be shown in the text box.